WorkingWithPutty
https://docs.rc.uab.edu/
Please use the new documentation url https://docs.rc.uab.edu/ for all Research Computing documentation needs.
As a result of this move, we have deprecated use of this wiki for documentation. We are providing read-only access to the content to facilitate migration of bookmarks and to serve as an historical record. All content updates should be made at the new documentation site. The original wiki will not receive further updates.
Thank you,
The Research Computing Team
Overview
This document covers the steps to install and configure PuTTY on Windows computers. The following is an overview of configuring putty, create a session for the Cheaha cluster, and transfer files.
SSH Keys
The process of configuring SSH keys to communicate with the Cheaha cluster, differs, depending on your client operating system. Linux and Mac should already have the appropriate SSH client software installed, Windows will require the installation of PuTTY.
PuTTY
If PuTTY is installed, skip to the next section "Set Environment Variables".
If PuTTY isn't already installed on your system, download and run the PuTTY installer to install PuTTY using the graphical installation tool.
Alternatively, you can download the individual components to a directory of your choosing (Following images show the path for the installation as "C:\Putty"). This install approach does not require Windows Administrator privileges:
NOTE: Using the individual component install approach requires that you add the installation directory to your PATH. See this Microsoft Support page for details on altering the PATH environment variable.
Set Environment Variables
- Click on Start -> My Computer -> Right-click -> Properties -> Advanced -> Environment Variables
- In the "User Variables for Administrator", click New.
- Set the two Variable name and value fields as below:
Variable name: PATH
Variable value: /path/to/your/installed/putty/location
- Click OK on all the opened windows.
- Image below shows setting the PATH variable to C:\Putty.

NOTE: If the PATH variable is already defined in the list of "User Variables for Administrator", follow these steps:
- Select the variable PATH -> Edit
- In the Variable value: field, go to the beginning of the line and type in the directory where you have installed putty tools, followed by a semicolon. In the image below, putty was installed at "C:\Putty".

- Click OK on all the opened windows.
Generate an SSH Key Pair
Generate a public-private key pair by running the puttygen command.
Start PuTTYgen by either:
- Clicking Start -> All Programs -> PuTTY --> PuTTYgen
- Opening Windows Explorer / My Computer, browse to the PuTTY directory and double click 'puttygen'
This will bring up a window to manage your key pair.

Press the "Generate" button to start the process. You will be requested to move your mouse around in the blank are of that window to help generate a good random number. The progress bar will fill in as you do so letting you know when the process is complete. Once complete, the PuTTY Gen window will display your public key and offer you various options to work with that key.

- Change the "Key Comment" to your Windows host name (run 'hostname' at the command prompt to discover the name of your Windows system)
- Set a passphrase for your private key, filling in both the "Key passphrase" and "Confirm passphrase" text boxes with the same passphrase. The passphrase is a local password for this private key. It doesn't have anything to do with any other passwords. It is strictly about protecting the private key that you just generated. Please refer to the UAB IT page for instructions on creating a strong password. You need to remember this passphrase because you will be prompted for it whenever you use this key-pair.
- Press the "Save private key" button. The save button, will by default save the private key to your "My Documents" folder. This is fine, and you can give any file name you like. Just remember the name and where you saved it, so you can load it in the next steps.
- Keep your PuTTY Key Generator window open so we can use below when we register you public key with the SSH server.
- Remember your passphrase.
Create a Session Definition
The PuTTY tools that MATLAB Parallel Computing Toolbox leverages are configured by creating "Saved Sessions" PuTTY.
To create a PuTTY session for cheaha.uabgrid.uab.edu, follow these steps.
Start PuTTY by either:
- Clicking Start -> All Programs -> PuTTY --> PuTTY
- Opening Windows Explorer / My Computer, browse to the PuTTY directory and double click 'putty'
- This brings up the following dialog that has a collection of configuration categories in the "Category:" window on the left, and a context sensitive set of actions on the right. That is, if you change the category on the left you will change what you see on the right. The default category that you see is the Session, which is the main focus of our work here.

- In the default "Session" category, fill in the "Host Name (or IP address)" text box with "cheaha.uabgrid.uab.edu", and fill in the "Saved Sessions" text box with "cheaha.uabgrid.uab.edu". Press the "Save" button
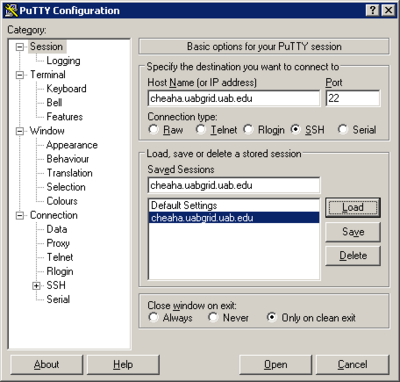
- Select the "Data" sub-category under the "Connection" category from the left-side Category browser. Fill in the "Auto-login username" text box with the username for your account on cheaha.
- Select the "Session" category, and press "Save" again. You now have a saved session ready for use.
- Press the "Open" button at the bottom on the dialog. This will bring up a login window with a login prompt for your password. Provide your cheaha password to login. Keep this session open, as you will use it in the next section.


Register Your Public Key
In order to use your public-private key-pair to start an SSH session, you need to register you public key with cheaha by adding your public key to the list of authorized keys for that SSH server.
- Use the SSH connection established in the previous step
- In the PuTTYgen window text area labeled "Public key for pasting into OpeSSH authorized_keys file:", select the public key by right clicking the key and clicking "Select All". Copy the key by right clicking again and selecting "Copy"
- In the SSH session window, enter the command
vi $HOME/.ssh/authorized_keys
- Press the SHIFT and o keys (in other words, a capital letter O), and the press your right mouse button over this window. This will paste your public key onto a new line. Press the Escape (Esc) key, press the key sequence colon-w-q-enter (:wq Enter)
- Fix the file permissions using the command
chmod u=rw $HOME/.ssh/authorized_keys
- End the session. Type the command
exit
You can close the PuTTY Configuration and PuTTY Key Generator windows now if you haven't already done so.
Load Your Private Key
Loading your private key is the first step you will take prior to submitting jobs to cheaha. This step essentially activates your key so that all PuTTY-based tools can use it in their operations.
Start PuTTYagent by either:
- Clicking Start -> All Programs -> PuTTY --> PuTTYagent
- Opening Windows Explorer / My Computer, browse to the PuTTY directory and double click 'pagent'
This will place the "Pageant" icon (a computer wearing a tilted hat: ![]() ) in you shortcuts toolbar in the lower-right of our screen.
) in you shortcuts toolbar in the lower-right of our screen.
- Click on the icon to bring up the Pageant Key List dialog
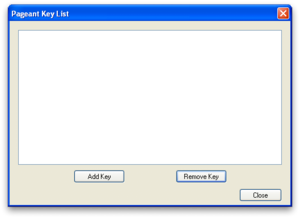
- Press the "Add Key" button. From the file dialog, select the private key created above (in My Documents by default)
- Press "Open" on the file dialog, you will be prompted for the passphrase to load your private key. Enter in the passphrase and click OK

The private key should now be loaded and ready for use with all PuTTY-based tools. Click the close button to minimize PuTTYagent.
Warning: While Pageant is running and has your private key loaded, anyone else using your computer can access your account on Cheaha. Please LOCK your workstation when unattended!
You are now ready to begin using the Cheaha cluster.
File Transfer
To transfer files between your Windows desktop/laptop and Cheaha cluster, We will use psftp. To facilitate automatic login to the Cheaha cluster, keep your pageant running with your public key added (as above). NOTE: Before doing a file transfer, save your images in a folder with a name which does not have any spaces, such as C:\images to make it easier to do a copy.
PSFTP
- Start psftp. This will be Start -> Run -> psftp (Assuming that you've added the putty exe's to your PATH). Click Run.
- A window with psftp prompt will open.

- Open psftp connection to Cheaha with open <userid>@cheaha.uabgrid.uab.edu

NOTE: If pageant is running, you will not be prompted for a password. Authentication for psftp will be done through ssh-key exchange by Pageant.
- Some terminology when using psftp, local and remote
- local - your Windows desktop/laptop. Commands for traversing local directories from psftp prompt
- lcd to change directory and lpwd to show present working directory. To change your local directory to the images location, type:
- local - your Windows desktop/laptop. Commands for traversing local directories from psftp prompt
lcd C:\images
New local directory is C:\images
NOTE: Mention the full path starting from C:\ to change local directory from psftp prompt
- remote - in this case, Cheaha cluster. Commands for traversing remote directories from psftp prompt
- cd to change directory and pwd' to show present working directory on the remote host. To change your remote directory to subjects dir, do:
- remote - in this case, Cheaha cluster. Commands for traversing remote directories from psftp prompt
cd subjects
Remote directory is now /home/<user>/subjects
Local to Remote
- To transfer a single file/image from local to Cheaha
put <src-img-name> <dst-img-name>
- To transfer multiple files from local
mput <img1> <img2> <img3>
NOTE: each image is separated by a space.
- To transfer all the files in the local directory
mput *
- To transfer a directory to remote
put -r images
To transfer multiple directories from local to remote
mput -r <dir1> <dir2> <dir3>
Remote to Local
- To transfer a single file from Cheaha to local
get <src-img-name> <dst-img-name>
- To transfer multiple files from remote to local
mget <img1> <img2> <img3>
- To transfer all the files in the local directory
mget *
- To transfer a directory from remote
get -r subjects
- To transfer multiple directories from remote to local
mget -r <dir1> <dir2> <dir3>