TortoiseSVN
https://docs.rc.uab.edu/
Please use the new documentation url https://docs.rc.uab.edu/ for all Research Computing documentation needs.
As a result of this move, we have deprecated use of this wiki for documentation. We are providing read-only access to the content to facilitate migration of bookmarks and to serve as an historical record. All content updates should be made at the new documentation site. The original wiki will not receive further updates.
Thank you,
The Research Computing Team
Project support with Trac and Subversion are available for collaborations.
The easiest way to interact with the Subversion repositories from a Microsoft Windows platform is to use the TrotoiseSVN client. This tool adds menu items to your regular file browser menus that enable you to interact with repositories on remote servers and local working copies that you have checked out. To get started using this tool, simply download the appropriate installer for your platform and complete the install.
Configuring Subversion Access via SSH
Once the install is complete you will want to take some extra steps to interact smoothly with any repositories that provide Subversion access via SSH, like those currently offered on projects.uabgrid.uab.edu or personal repositories you may set up. These are repositories that use connection strings like "svn+ssh://hostname/path".
After following these instructions you will have set up TortoiseSVN to use SSH authentication with a public-private key-pair. This will enable you to carry out repository actions via SSH without repeated prompts for a login password. The final configuration will result in a single prompt for a local password associated with the private key. All subsequent actions will occur seamlessly without additional password prompts.
Get SSH Connection Configuration Tools
While TortoiseSVN is installed with it's own version of the plink tool that you need to connect via SSH to a server, it does not provide the tools you need to define and maintain the connection parameters needed for the hosts to which you will connect. What this means is that, by default, you will need to provide those connection parameters (e.g. like username and password) for every interaction TortoiseSVN makes with the repository. This can be a lot of overhead.
Luckily, TortoiseSVN implements it's SSH support using the PuTTY tools, so you can easily add the missing tools by simply downloading the individual tools and adding them to the directory where TortoiseSVN executable is installed (usually "C:\Program Files\TortoiseSVN\bin"). To download the tools, go to the PuTTY Downloads page and save each of the following tools to TortoiseSVN executable directory: putty.exe, plink.exe,pageant.exe, puttygen.exe. You can also install pscp.exe and psftp.exe to help with manual file transfers, but they are not used by this TortoiseSVN or these instructions.
Generate an SSH Key Pair
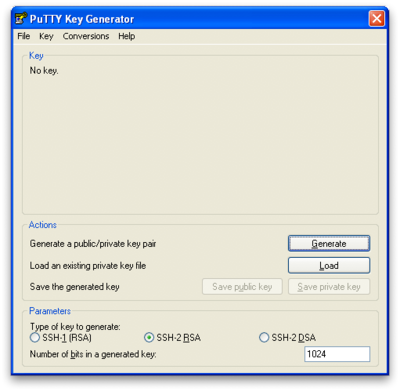
The first thing you need to do to accomplish a single-password-prompt for subversion access is generate a public-private key pair. Start the DOS command shell (e.g. Run... cmd, Programs->Accessories->Command Prompt). Type the command "puttygen" and press enter. This will bring up a window to manage your key pair.
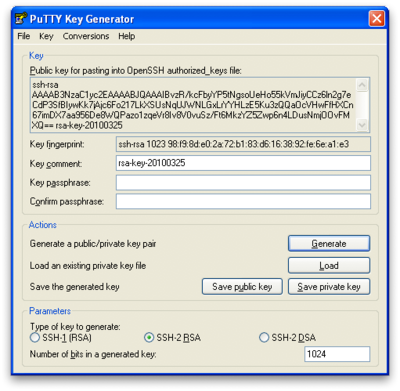
The first step is to press the "Generate" button to start the process. You will be requested to move your mouse around in the blank are of that window to help generate a good random number. The progress bar will fill in as you do so letting you know when the process is complete. Once complete, the PuTTY Gen window will display your public key and offer you various options to work with that key.
There are four things you need to:
- Set a passphrase for your private key, filling in both the "Key passphrase" and "Confirm passphrase" text boxes with the same passphrase. The passphrase is your local password for this private key. It doesn't have anything to do with any other passwords. It is strictly about protecting the private key that you just generated. It can be whatever you like, but brief multi-word phrases that you can easily remember are a good choice. You need to remember this passphrase because you will be prompted for it whenever you use this key-pair.
- Press the "Save private key" button. The save button, will by default save the private key to your "My Documents" folder. This is fine, and you can give any file name you like. Just remember the name and where you saved it, so you can load it in the next steps.
- Keep your PuTTY Key Generator window open so we can use below when we register you public key with the SSH server.
- Remember your passphrase.
Create a Session Definition
The trick to configuring TortoiseSVN for seamless use of SSH is storing your connection configuration information so you don't have to type it in manually every time TortoiseSVN makes a connection to the server.
The PuTTY tools that TrotoiseSVN leverages are configured by creating "Saved Sessions" using the putty.exe command. The defined session names can then be used in place of hostnames by any application, like TortoiseSVN, that leverages the PuTTY tools.
To create a PuTTY session for projects.uabgrid.uab.edu, follow these steps.
- Start the PuTTY session editor by running "putty.exe" from the Run... menu item or the command prompt. This brings up the following dialog that has a collection of configuration categories in the "Categories:" window on the left, and an context sensitive set of actions on the right. That is, if you change the category on the left you will change what you see on the right. The default category that you see is the Session, which is the main focus of our work here.

- In the default "Session" category, fill in the "Host Name (or IP address)" text box with "projects.uabgrid.uab.edu", and fill in the "Saved Sessions" text box with "projects.uabgrid.uab.edu". Press the "Save" button

- Select the "Data" sub-category under the "Connection" category from the left-side Category browser. Fill in the "Auto-login username" text box with the username for your account on the SSH server.
- Select the "Session" category, and press "Save" again. You now have a saved session ready for use.
- Press the "Open" button at the bottom on the dialog. This will bring up a login window with a login prompt for your password. Provide the password to login. Keep this session open, as you will use it in the next section.
Register Your Public Key
In order to use your public-private key-pair to start an SSH session, you need to register you public key with the SSH server. The requires that you add your public key to the list of authorized keys for that SSH server.
The current steps required for projects.uabgrid.uab.edu are as follows:
- Use the SSH connection you established in the previous step. If you've closed it just type, "putty @projects.uabgrid.uab.edu" to start it again and login in with your password when prompted.
- Create a configuration directory for SSH. Enter the command
mkdir -p $HOME/.ssh
- Copy your public key to your clipboard. In the PuTTY Key Generator window (opened in the previous steps above), select the public key from the text area labeled "Public key for pasting into OpeSSH authorized_keys file:". Use "Ctrl+c" to copy the public key once you've selected it.
- Register your public key. In the SSH session window that you opened, enter the command
vi $HOME/.ssh/authorized_keys
- Press the "a" key, and the press your right mouse button over this window. This will paste your public key into your newly created file. Press the Escape (Esc) key, press the key sequence colon-w-q-enter (:wq Enter).
- Fix the permissions. Type the command
chmod u=rw $HOME/.ssh/authorized_keys
- End the session. Type the command
exit
This completes your configuration steps.
You are now ready to use the simplified SSH access with TortoiseSVN. You can close the PuTTY Configuration and PuTTY Key Generator windows now if you haven't already done so/
Note: You may think these steps to registering you public key onerous and error prone. We agree. Our goal is to improve this process so it becomes an easy paste to a web page and you don't need to worry about typing in a lot of commands. We're planning to improve this, you can follow our progress here.
Load Your Private Key
Loading your private key is the first step you will take when use TortoiseSVN. This step essentially activates your key so that all PuTTY-based tools, like TortoiseSVN, can use it in their operations.
- From the Run... menu or the command prompt, type
pageant
This will place the "Pageant" icon (a computer wearing a tilted hat: ) in you shortcuts toolbar in the lower-right of our screen.
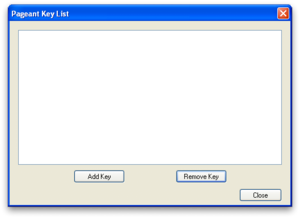
 - Click on the icon to bring up the Pageant Key List dialog

- Press the "Add Key" button. From the file dialog, select the private key you created above (in My Documents by default).
- Once you select your key file and press "Open" on the file dialog, you will be prompted for the passphrase to load your private key. Enter in the passphrase you chose above.
Your private key should now be loaded and ready for use with all PuTTY-based tools.
Note: You can add the "pageant.exe" command to your Autorun folder so it is started each time you log into your desktop. You will then only need to load your private key once per-login.
Use TortoiseSVN
You can now use TortoiseSVN to interact with your subversion repository without further prompting for credentials. Just remember to load your private key into the Pageant Key List and use the session name you defined as the target for accessing your subversion repository via SSH, eg. projects.uabgrid.uab.edu.
Note for advanced users: You can define session names that are more meaningful to you. That is, the session name can be anything you want. The only thing you need to do is then use that session name in place of the normal host name when defining your svn+ssh:// url in TortoiseSVN. We chose to define the session name as projects.uabgrid.uab.edu to help those folks who've already checked out there code using that name name, they don't have to change anything with their checked out repository to start using this improvement.
References
These instructions were adapted from:

