TortoiseSVN
https://docs.rc.uab.edu/
Please use the new documentation url https://docs.rc.uab.edu/ for all Research Computing documentation needs.
As a result of this move, we have deprecated use of this wiki for documentation. We are providing read-only access to the content to facilitate migration of bookmarks and to serve as an historical record. All content updates should be made at the new documentation site. The original wiki will not receive further updates.
Thank you,
The Research Computing Team
Project support with Trac and Subversion are available for collaborations.
The easiest way to interact with the Subversion repositories from a Microsoft Windows platform is to use the [1] client. This tool adds menu items to your regular file browser menus that enable you to interact with repositories on remote servers and local working copies that you have checked out. To get started using this tool, simply the appropriate installer for your platform and complete the install.
Configuring Subversion Access via SSH
Once the install is complete you will want to take some extra steps to interact smoothly with any repositories that provide Subversion access via SSH, like those currently offered on projects.uabgrid.uab.edu or personal repositories you may set up. These are repositories that use connection strings like "svn+ssh://hostname/path".
Get SSH Connection Configuration Tools
While TortoiseSVN is installed with it's own version of the plink tool that you need to connect via SSH to a server, it does not provide the tools you need to define and maintain the connection parameters needed for the hosts to which you will connect. What this means is that, by default, you will need to provide those connection parameters (e.g. like username and password) for every interaction TortoiseSVN makes with the repository. This can be a lot of overhead.
Luckily, TortoiseSVN implements it's SSH support using the PuTTY tools, so you can easily add the missing tools by simply downloading the individual tools and adding them to the directory where TortoiseSVN executable is installed (usually "C:\Program Files\TortoiseSVN\bin"). To download the tools, go to the PuTTY Downloads page and save each of the following tools to TortoiseSVN executable directory: putty.exe, plink.exe,pageant.exe, puttygen.exe. You can also install pscp.exe and psftp.exe to help with manual file transfers, but they are not used by this TortoiseSVN or these instructions.
Generate an SSH Key Pair
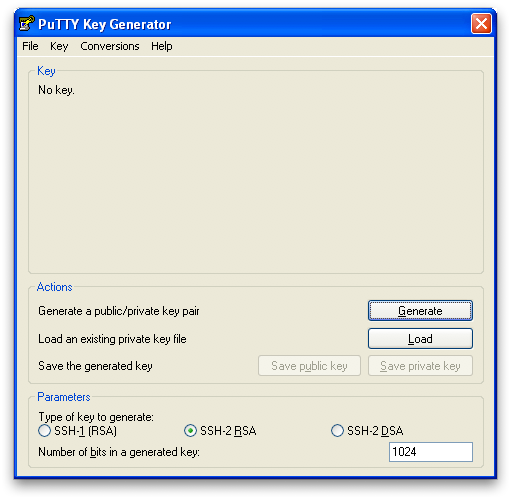
The first thing you need to do to accomplish a single-password-prompt for subversion access is generate a public-private key pair. Start the DOS command shell (e.g. Run... cmd, Programs->Accessories->Command Prompt). Type the command "puttygen" and press enter. This will bring up a window to manage your key pair.
The first step is to press the "Generate" button to start the process. You will be requested to move your mouse around in the blank are of that window to help generate a good random number. The progress bar will fill in as you do so letting you know when the process is complete. Once complete, the PuTTY Gen window will display your public key and offer you various options to work with that key.
There are two things you need to:
- Set a passphrase for your private key, filling in both the "Key passphrase" and "Confirm passphrase" text boxes with the same passphrase. The passphrase is your local password for this private key. It doesn't have anything to do with any other passwords. It is strictly about protecting the private key that you just generated. It can be whatever you like, but brief multi-word phrases that you can easily remember are good choices. You need to remember this passphrase because you will be prompted for it whenever you use this key-pair.
- Press the "Save private key" button.
The save button, will by default save the private key to your "My Documents" folder. This is fine, and you can give any file name you like. Just remember the name and where you saved it, so you can load it in the next steps.
