MATLAB DCS
https://docs.rc.uab.edu/
Please use the new documentation url https://docs.rc.uab.edu/ for all Research Computing documentation needs.
As a result of this move, we have deprecated use of this wiki for documentation. We are providing read-only access to the content to facilitate migration of bookmarks and to serve as an historical record. All content updates should be made at the new documentation site. The original wiki will not receive further updates.
Thank you,
The Research Computing Team
Cheaha now has a 128 node license for the Distributed Computing Server component of MATLAB.
In order to use DCS on Cheaha, you will have to use your own MATLAB and Parallel Computing Toolbox license.
Overview
The following is an overview of the process to run MATLAB jobs on cheaha using the Distributed Computing Server:
- Obtain your own MATLAB client license
- Obtain your own Parallel Computing Toolbox license
- Install and license both MATLAB client and Parallel Computing Toolbox on your Windows / Linux / Mac workstation
- Configure SSH on your workstation (see the section on 'SSH Keys' below)
- Download and extract the MATLAB submission functions to your MATLAB PATH
- Add Cheaha to the Parallel Computing Toolbox configuration
- Write, test and debug your parallel code on your local workstation
- Once the code is ready for production, run it on Cheaha using the Parallel Computing Toolbox
- After the job completes (you will receive an email), retrieve the results
- Destroy the job related content on cheaha to clean up
SSH Keys
The MATLAB Parallel Computing Toolbox uses SSH authentication via public-private key-pair to connect to the MATLAB Distributed Computing Server on the cluster head node.
The process of configuring SSH keys differs depending on your client operating system. Linux and Mac should already have the appropriate SSH client software installed, Windows will require the installation of PuTTY.
Windows
This section documents the steps to install and configure PuTTY on Windows computers. This software provides the utilities that MATLAB uses to communicate with the head node.
PuTTY
If PuTTY is installed, skip to the next section "Generate an SSH Key Pair".
If PuTTY isn't already installed on your system, download and run the PuTTY installer to install PuTTY using the graphical installation tool.
Alternatively, you can download the individual components to a directory of your choosing. This install approach does not require Windows Administrator privileges:
NOTE: Using the individual component install approach requires that you add the installation directory to your PATH. See this Microsoft Support page for details on altering the PATH environment variable.
Generate an SSH Key Pair
Generate a public-private key pair by running the puttygen command.
Start PuTTYgen by either:
- Clicking Start -> All Programs -> PuTTY --> PuTTYgen
- Opening Windows Explorer / My Computer, browse to the PuTTY directory and double click 'puttygen'
This will bring up a window to manage your key pair.

Press the "Generate" button to start the process. You will be requested to move your mouse around in the blank are of that window to help generate a good random number. The progress bar will fill in as you do so letting you know when the process is complete. Once complete, the PuTTY Gen window will display your public key and offer you various options to work with that key.

- Change the "Key Comment" to your Windows host name (run 'hostname' at the command prompt to discover the name of your Windows system)
- Set a passphrase for your private key, filling in both the "Key passphrase" and "Confirm passphrase" text boxes with the same passphrase. The passphrase is a local password for this private key. It doesn't have anything to do with any other passwords. It is strictly about protecting the private key that you just generated. Please refer to the UAB IT page for instructions on creating a strong password. You need to remember this passphrase because you will be prompted for it whenever you use this key-pair.
- Press the "Save private key" button. The save button, will by default save the private key to your "My Documents" folder. This is fine, and you can give any file name you like. Just remember the name and where you saved it, so you can load it in the next steps.
- Keep your PuTTY Key Generator window open so we can use below when we register you public key with the SSH server.
- Remember your passphrase.
Create a Session Definition
The PuTTY tools that MATLAB Parallel Computing Toolbox leverages are configured by creating "Saved Sessions" PuTTY.
To create a PuTTY session for cheaha.uabgrid.uab.edu, follow these steps.
Start PuTTY by either:
- Clicking Start -> All Programs -> PuTTY --> PuTTY
- Opening Windows Explorer / My Computer, browse to the PuTTY directory and double click 'putty'
- This brings up the following dialog that has a collection of configuration categories in the "Category:" window on the left, and a context sensitive set of actions on the right. That is, if you change the category on the left you will change what you see on the right. The default category that you see is the Session, which is the main focus of our work here.

- In the default "Session" category, fill in the "Host Name (or IP address)" text box with "cheaha.uabgrid.uab.edu", and fill in the "Saved Sessions" text box with "cheaha.uabgrid.uab.edu". Press the "Save" button
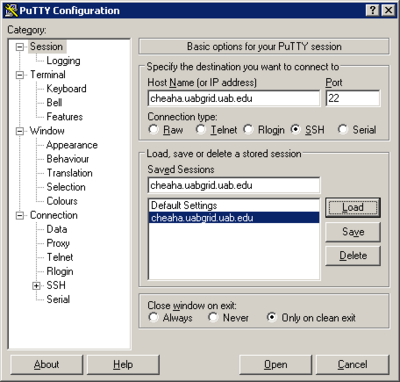
- Select the "Data" sub-category under the "Connection" category from the left-side Category browser. Fill in the "Auto-login username" text box with the username for your account on cheaha.
- Select the "Session" category, and press "Save" again. You now have a saved session ready for use.
- Press the "Open" button at the bottom on the dialog. This will bring up a login window with a login prompt for your password. Provide your cheaha password to login. Keep this session open, as you will use it in the next section.


Register Your Public Key
In order to use your public-private key-pair to start an SSH session, you need to register you public key with cheaha by adding your public key to the list of authorized keys for that SSH server.
- Use the SSH connection established in the previous step
- In the PuTTYgen window text area labeled "Public key for pasting into OpeSSH authorized_keys file:", select the public key by right clicking the key and clicking "Select All". Copy the key by right clicking again and selecting "Copy"
- In the SSH session window, enter the command
vi $HOME/.ssh/authorized_keys
- Press the SHIFT and o keys (in other words, a capital letter O), and the press your right mouse button over this window. This will paste your public key onto a new line. Press the Escape (Esc) key, press the key sequence colon-w-q-enter (:wq Enter)
- Fix the file permissions using the command
chmod u=rw $HOME/.ssh/authorized_keys
- End the session. Type the command
exit
You can close the PuTTY Configuration and PuTTY Key Generator windows now if you haven't already done so.
Load Your Private Key
Loading your private key is the first step you will take prior to using MATLAB to submit jobs to cheaha. This step essentially activates your key so that all PuTTY-based tools can use it in their operations.
Start PuTTYagent by either:
- Clicking Start -> All Programs -> PuTTY --> PuTTYagent
- Opening Windows Explorer / My Computer, browse to the PuTTY directory and double click 'pagent'
This will place the "Pageant" icon (a computer wearing a tilted hat: ![]() ) in you shortcuts toolbar in the lower-right of our screen.
) in you shortcuts toolbar in the lower-right of our screen.
- Click on the icon to bring up the Pageant Key List dialog
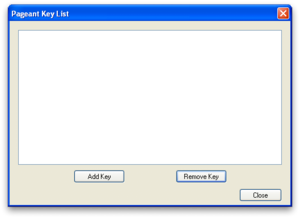
- Press the "Add Key" button. From the file dialog, select the private key created above (in My Documents by default)
- Press "Open" on the file dialog, you will be prompted for the passphrase to load your private key. Enter in the passphrase and click OK

The private key should now be loaded and ready for use with all PuTTY-based tools. Click the close button to minimize PuTTYagent.
Warning: While Pagent is running and has your private key loaded, anyone else using your computer can access your account on Cheaha. Please LOCK your workstation when unattended!
You are now ready to begin using the MATLAB Parallel Computing Toolbox.
Linux
If you don't already have an RSA key-pair generated for your user account on your workstation, do so by running the following command (choose a good passphrase)
$ ssh-keygen -t rsa

Enter file in which to save the key (~/.ssh/id_rsa):
Enter passphrase (empty for no passphrase):
Enter same passphrase again:
Copy the public key to cheaha (change USERID to your cheaha login id). You will be prompted for your cheaha password.
$ ssh-copy-id -i $HOME/.ssh/id_rsa.pub USERID@cheaha.uabgrid.uab.edu
Add your cheaha's userid to your local .ssh/config. (open up in an editor - vi/emacs/geanie)
Host *uabgrid.uab.edu
   user=<your-user-id>
Run ssh-agent to load the key on your Linux workstation
$ ssh-agent
Enter passphrase for ~/.ssh/id_rsa:
Identity added: ~/.ssh/id_rsa (~/.ssh/id_rsa)
Now test that you can connect to cheaha without entering a password (again change USERID to your login name)
$ ssh USERID@cheaha.uabgrid.uab.edu uptime

 15:34:10 up 9 days,  5:11, 14 users,  load average: 0.25, 0.34, 0.50
Mac
Steps for Mac are same as for Linux, except that, on MacOSX ssh-copy-id command is not included. So, append the RSA-key from Mac desktop to Cheaha, using the following command:
cat $HOME/.ssh/id_rsa.pub | ssh USERID@cheaha.uabgrid.uab.edu "cat >> ~/.ssh/authorized_keys"
NOTE: There is already a key in the authorized_keys file on Cheaha, by mistake if you delete or overwrite that you will have problems submitting jobs on Cheaha. So make sure you follow the above instructions correctly.
MATLAB from Your Desktop
Once SSH has been successfully configured, you are ready to continue setting up the MATLAB client.
MATLAB Parallel Computing Toolbox enables you to submit your MATLAB code to the cluster without leaving the graphical interface.
This section discusses the following steps:
- Download and extract the MATLAB submission functions
- Start the MATLAB client
- Add the cheaha Parallel Computing Toolbox configuration
- Perform the validation tests
MATLAB Submit Functions
In order for Parallel Computing Toolbox to work with our cluster, you will have to copy the special submit functions to your MATLAB PATH.
- Download the appropriate zipped file (note that both Linux and Mac use the 'unix' submit functions)
- Windows MATLAB Submit Functions - Updated 05/13/2010
- Linux MATLAB Submit Functions - Updated 05/13/2010
- Mac MATLAB Submit Functions - Updated 05/13/2010
- Unzip the files to a directory on your MATLAB PATH. Typical MATLAB PATH locations are:
- All Systems: $MATLABROOT/toolbox/local
- Windows: My Documents\MATLAB
- Linux: $HOME/Documents/MATLAB
- Mac: ???
Once the submit function files have been unzipped to your MATLAB PATH, you can start the MATLAB client.
Parallel Computing Toolbox Configuration
In this section we will add the cheaha configuration to the Parallel Computing Toolbox followed by a quick validation test.
Prior to continuing, make sure that you've completed the following:
- Configured SSH and successfully tested passwordless authentication to Cheaha
- Loaded your SSH key
- Windows users - means starting PuTTY Pagent and loading your SSH key
- Linux users - means running ssh-agent to load the SSH key
- Mac users - same as for Linux, run ssh-agent
- Downloaded and extracted the latest MATLAB submission scripts to your MATLAB PATH
Now that the prerequisites are complete:
- Download and save the Cheaha cluster configuration file, this will be imported into MATLAB further down
- Start the MATLAB client on your workstation (Windows users should have a MATLAB icon on the desktop), Linux may have to use the command line. On Mac, from Finder click on the MATLAB icon located at /Applications/
- Click the Parallel menu
- Click Manage Configurations
- Click File -> Import
- Browse to the location where you saved the cheaha.mat file select it and click Open
The Configuration Manager should now list a new entry for cheaha.

You may have to change the following settings (double click on cheaha in the Configuration Manager window):
- Root directory of MATLAB installation for workers (ClusterMatlabRoot): /share/apps/mathworks/R2010a
- Directory where job data is stored (DataLocation): C:\jobs\matlab
The configuration will look similar to this screen shot

Examples
Parfor
This example uses two files:
- myRand.m - a script with a parfor loop that executes rand
- remoteParfor01.m - the submission script
The following steps will cover the creation and submission of the scripts
- Create the myRand.m script as follows
a = 5;
a = a * rand;

parfor ii = 1:10
  b(ii) = a*rand;
end
- Next create the remoteParfor01.m script making sure to change the YOUREMAIL string to a working email address
% Always set these variables
email           = 'YOUREMAIL';
email_opt       = 'eas';      % qsub email options
s_rt            = '00:05:00'; % soft wall time
h_rt            = '00:07:00'; % hard wall time
mem_free        = '1G';       % Amount of memory need per task
min_cpu_slots   = 4;          % Minimum number of cpu slots needed for the parallel job
max_cpu_slots   = 8;          % Maximum number of cpu slots needed for the parallel job

% Configure the scheduler - Do NOT modify these
sge_options = ['-l matlab_dcs=1,mem_free=', mem_free, ',h_rt=', h_rt, ',s_rt=', s_rt, ' -m ', email_opt, ' -M ', email];
SGEClusterInfo.setExtraParameter(sge_options);
sched = findResource();
% End of scheduler configuration

% start of user specific commands
pjob = batch('myRand', 'matlabpool', max_cpu_slots, 'FileDependencies', {'myRand.m'});

waitForState(pjob)
results = getAllOutputArguments(pjob);
celldisp(results)
- Select Cheaha as the parallel configuration by clicking Parallel -> Select Configuration -> cheaha in the main MATLAB window
- Run the remoteParfor01.m code by clicking the green run arrow in the MATLAB Editor
- After several seconds you should see output similar to the following in the MATLAB Command Window
- The job 279119 is the job number assigned by the Cheaha scheduler
- The Job2 is the job name and number used by MATLAB to reference the job. In most cases, this is the number that you'll use to interact with MATLAB to load the results, clean up the job, etc...
Your job 279119 ("Job2") has been submitted
- Once the job completes (since we used waitForState in the job, MATLAB will wait for the job to complete, followed by the celldisp function to display the results) you'll see output similar to the following:
results{1} =

                a: 4.5864
                b: [1.3534 1.6175 0.2594 2.0416 2.1097 4.3385 3.6999 3.8284 4.3162 0.4539]
            email: 'mhanby@uab.edu'
        email_opt: 'eas'
             h_rt: '00:07:00'
    max_cpu_slots: 8
         mem_free: '1G'
    min_cpu_slots: 4
             s_rt: '00:05:00'
      sge_options: [1x80 char]
You should see the results variable listed in the workspace view on the right. Double click results to open the Variable Editor, then double click results{1,1} to drill into the structure where you'll find the variables a and b that have the random numbers.
In cases where the job will run for more than a few minutes, you won't want to use the waitForState, results = and celldisp in your script.
This will allow you to perform other tasks in MATLAB or exit entirely without having to wait for your job to complete.
MATLAB provides a function to load a job into the client called findJob.
In the example above, our MATLAB job name was Job2 and from that we can deduce that the MATLAB job number was 2, it can be loaded as follows:
>> clear
>> sched = findResource();
>> findJob(sched,'ID',2)


ans =

MatlabPool Job ID 2 Information
===============================

                  UserName : mhanby
                     State : finished
                SubmitTime : Tue May 18 09:34:40 CDT 2010
                 StartTime : Tue May 18 09:35:26 CDT 2010
          Running Duration : 0 days 0h 0m 6s

- Data Dependencies

          FileDependencies : C:\jobs\matlab\parfor01\myRand.m
                           : C:\jobs\matlab\parfor01\myRand.m
          PathDependencies : {}

- Associated Task(s)

           Number Pending  : 0
           Number Running  : 0
           Number Finished : 9
          TaskID of errors :

- Scheduler Dependent (MatlabPool Job)

    MaximumNumberOfWorkers : 9
    MinimumNumberOfWorkers : 9
When you are finished with your job, it is important to destroy the job in order to free up hard disk space on both your desktop and the cluster. It is important that any output you want to retain should be copied to another location on your Desktop prior to running destroy
>> clear
>> findJob(sched,'ID',2)
>> pjob.destroy
MATLAB from the Command Line
It is also possible to run MATLAB jobs on the cluster via the command line on Cheaha. This section has been moved to a separate page to avoid confusion with the MATLAB from the Desktop examples:
Please see the MatLab_CLI page for details.