MATLAB DCS: Difference between revisions
| Line 35: | Line 35: | ||
Press the "Generate" button to start the process. You will be requested to move your mouse around in the blank are of that window to help generate a good random number. The progress bar will fill in as you do so letting you know when the process is complete. Once complete, the PuTTY Gen window will display your public key and offer you various options to work with that key. | Press the "Generate" button to start the process. You will be requested to move your mouse around in the blank are of that window to help generate a good random number. The progress bar will fill in as you do so letting you know when the process is complete. Once complete, the PuTTY Gen window will display your public key and offer you various options to work with that key. | ||
[[Image:puttygen- | [[Image:puttygen-savekey2.png|400px]] | ||
# Set a passphrase for your private key, filling in both the "Key passphrase" and "Confirm passphrase" text boxes with the same passphrase. The passphrase is a '''local''' password for this private key. It doesn't have anything to do with any other passwords. It is strictly about protecting the private key that you just generated. Please refer to the UAB IT page for instructions on [http://main.uab.edu/Sites/it/faqs/49118/ creating a strong password]. You need to remember this passphrase because you will be prompted for it whenever you use this key-pair. | # Set a passphrase for your private key, filling in both the "Key passphrase" and "Confirm passphrase" text boxes with the same passphrase. The passphrase is a '''local''' password for this private key. It doesn't have anything to do with any other passwords. It is strictly about protecting the private key that you just generated. Please refer to the UAB IT page for instructions on [http://main.uab.edu/Sites/it/faqs/49118/ creating a strong password]. You need to remember this passphrase because you will be prompted for it whenever you use this key-pair. | ||
Revision as of 19:22, 9 April 2010
Cheaha now has a 128 node license for the Distributed Computing Server component of Matlab.
In order to use DCS on Cheaha, you will have to use your own Matlab and Parallel Computing Toolbox license.
SSH Keys
The Matlab Parallel Toolbox uses SSH authentication via public-private key-pair to connect to the Matlab Distributed Computing Server on the cluster head node.
The process of configuring SSH keys differs depends on your client operating system.
Windows
Matlab Parallel Toolbox does not provide the SSH clients, this section documents the use of either PuTTY or "SSH Secure Shell" (installed on most UAB workstations).
PuTTY
If PuTTY isn't already installed on your system, download the tools from the PuTTY Downloads page.
Download and run this file to install PuTTY using the graphical installation tool.
Alternatively, you can download the individual components to a directory of your choosing:
Generate an SSH Key Pair
We generate a public-private key pair by running the puttygen command. Start the command shell (e.g. Start -> Run... cmd or Programs->Accessories->Command Prompt). Type the command "puttygen" and press enter (you may have to change to the PuTTY installation directory). Alternatively, using Windows Explorer, browse to the PuTTY install directory and double click 'puttygen'.
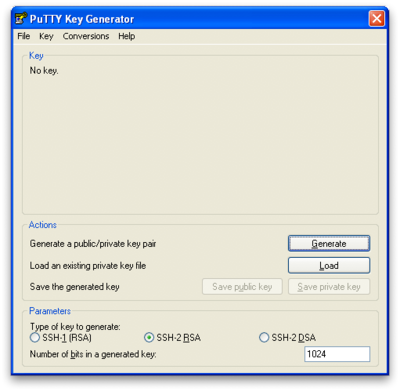
This will bring up a window to manage your key pair.
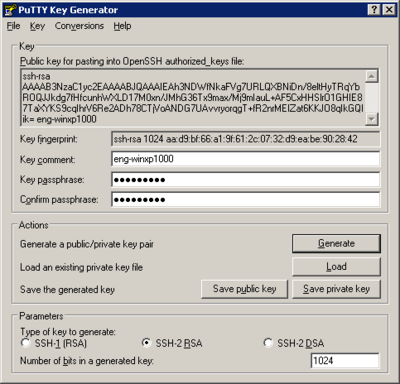
Press the "Generate" button to start the process. You will be requested to move your mouse around in the blank are of that window to help generate a good random number. The progress bar will fill in as you do so letting you know when the process is complete. Once complete, the PuTTY Gen window will display your public key and offer you various options to work with that key.
- Set a passphrase for your private key, filling in both the "Key passphrase" and "Confirm passphrase" text boxes with the same passphrase. The passphrase is a local password for this private key. It doesn't have anything to do with any other passwords. It is strictly about protecting the private key that you just generated. Please refer to the UAB IT page for instructions on creating a strong password. You need to remember this passphrase because you will be prompted for it whenever you use this key-pair.
- Change the "Key Comment" to your Windows host name (run 'hostname' at the command prompt to discover the name of your Windows system)
- Press the "Save private key" button. The save button, will by default save the private key to your "My Documents" folder. This is fine, and you can give any file name you like. Just remember the name and where you saved it, so you can load it in the next steps.
- Keep your PuTTY Key Generator window open so we can use below when we register you public key with the SSH server.
- Remember your passphrase.
Create a Session Definition
The trick to configuring TortoiseSVN for seamless use of SSH is storing your connection configuration information so you don't have to type it in manually every time TortoiseSVN makes a connection to the server.
The PuTTY tools that TrotoiseSVN leverages are configured by creating "Saved Sessions" using the putty.exe command. The defined session names can then be used in place of hostnames by any application, like TortoiseSVN, that leverages the PuTTY tools.
To create a PuTTY session for projects.uabgrid.uab.edu, follow these steps.
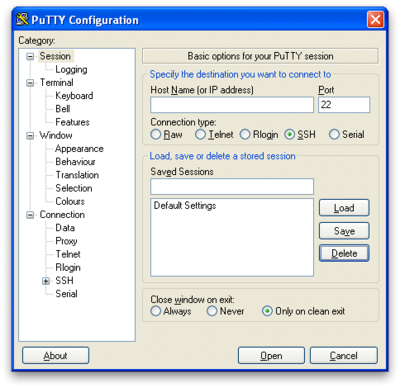
- Start the PuTTY session editor by running "putty.exe" from the Run... menu item or the command prompt. This brings up the following dialog that has a collection of configuration categories in the "Categories:" window on the left, and an context sensitive set of actions on the right. That is, if you change the category on the left you will change what you see on the right. The default category that you see is the Session, which is the main focus of our work here.
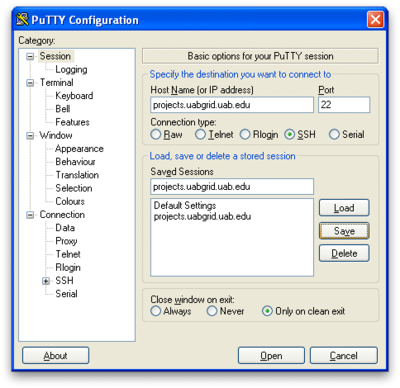
- In the default "Session" category, fill in the "Host Name (or IP address)" text box with "projects.uabgrid.uab.edu", and fill in the "Saved Sessions" text box with "projects.uabgrid.uab.edu". Press the "Save" button
- Select the "Data" sub-category under the "Connection" category from the left-side Category browser. Fill in the "Auto-login username" text box with the username for your account on the SSH server.
- Select the "Session" category, and press "Save" again. You now have a saved session ready for use.
- Press the "Open" button at the bottom on the dialog. This will bring up a login window with a login prompt for your password. Provide the password to login. Keep this session open, as you will use it in the next section.
Register Your Public Key
In order to use your public-private key-pair to start an SSH session, you need to register you public key with the SSH server. The requires that you add your public key to the list of authorized keys for that SSH server.
The current steps required for projects.uabgrid.uab.edu are as follows:
- Use the SSH connection you established in the previous step. If you've closed it just type, "putty @projects.uabgrid.uab.edu" to start it again and login in with your password when prompted.
- Create a configuration directory for SSH. Enter the command
mkdir -p $HOME/.ssh
- Copy your public key to your clipboard. In the PuTTY Key Generator window (opened in the previous steps above), select the public key from the text area labeled "Public key for pasting into OpeSSH authorized_keys file:". Use "Ctrl+c" to copy the public key once you've selected it.
- Register your public key. In the SSH session window that you opened, enter the command
vi $HOME/.ssh/authorized_keys
- Press the "a" key, and the press your right mouse button over this window. This will paste your public key into your newly created file. Press the Escape (Esc) key, press the key sequence colon-w-q-enter (:wq Enter).
- Fix the permissions. Type the command
chmod u=rw $HOME/.ssh/authorized_keys
- End the session. Type the command
exit
This completes your configuration steps.
You are now ready to use the simplified SSH access with TortoiseSVN. You can close the PuTTY Configuration and PuTTY Key Generator windows now if you haven't already done so/
Note: You may think these steps to registering you public key onerous and error prone. We agree. Our goal is to improve this process so it becomes an easy paste to a web page and you don't need to worry about typing in a lot of commands. We're planning to improve this, you can follow our progress here.
Load Your Private Key
Loading your private key is the first step you will take when use TortoiseSVN. This step essentially activates your key so that all PuTTY-based tools, like TortoiseSVN, can use it in their operations.
- From the Run... menu or the command prompt, type
pageant
This will place the "Pageant" icon (a computer wearing a tilted hat: ) in you shortcuts toolbar in the lower-right of our screen.
 - Click on the icon to bring up the Pageant Key List dialog
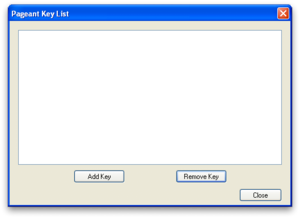
- Press the "Add Key" button. From the file dialog, select the private key you created above (in My Documents by default).
- Once you select your key file and press "Open" on the file dialog, you will be prompted for the passphrase to load your private key. Enter in the passphrase you chose above.
Your private key should now be loaded and ready for use with all PuTTY-based tools.
Note: You can add the "pageant.exe" command to your Autorun folder so it is started each time you log into your desktop. You will then only need to load your private key once per-login.
SSH Secure Shell
Generate an SSH Key Pair
Create a Session Definition
Register Your Public Key
Load Your Private Key
Matlab from the Command Line
Matlab Versions
Use the 'module' command to view a list of available Matlab versions. If the version that you require isn't listed, please open a help desk ticket to request the installation.
The following is an example output of the command and doesn't necessarily represent the currently installed versions:
$ module avail mathworks

------------------------------------ /etc/modulefiles -------------------------------------
mathworks/R2009b
mathworks/R2009a
Simple Matlab Test
A simple test to verify that the Matlab client on Cheaha can check out a license from your server.
Set up your environment with the command:
$ module load mathworks/R2009b
As a test, you can run MatLab and access your license server with
$ matlab -c port@license-server -nodesktop -nojvm -r "rand, exit"
For example:
$ module load mathworks/R2009b
$ matlab -c 27000@licserver.uab.edu -nodesktop -nojvm -r "rand, exit"

                        < M A T L A B (R) >
                Copyright 1984-2009 The MathWorks, Inc.
              Version 7.9.0.529 (R2009b) 64-bit (glnxa64)
                          August 12, 2009

  To get started, type one of these: helpwin, helpdesk, or demo.
  For product information, visit www.mathworks.com.

ans =

    0.8147
This will start matlab without a graphical display and without Java support. This is good just to verify things work, but do not run any significant computations on the Cheaha head node!
MatLab computational work must be run on the compute nodes by submitting a job submission script to the SGE scheduler
Serial Matlab
Serial Matlab jobs have the following characteristics:
* Consumes one of your client licenses for the duration of the job
* Does not use the distributed licenses available on cheaha
* Does not require the parallel computing toolbox
* Restricted to a single CPU core (slot)
See the next section for an example using the distributed computing license.
Create a job script "matlabtest.qsub" making sure to change:
* YOUR_EMAIL_ADDRESS
* h_rt and s_rt to appropriate hard and soft runtime limits
* h_vmem to the maximum amount of memory that your job will use
$ mkdir -p $UABGRID_SCRATCH/jobs/matlab/serial01/output
$ cd $UABGRID_SCRATCH/jobs/matlab/serial01
#!/bin/bash
#$ -S /bin/bash
#$ -cwd
#
#$ -N serialMatlab
#$ -l h_rt=00:10:00,s_rt=00:08:00,h_vmem=2G
#$ -j y
#
#$ -M YOUR_EMAIL_ADDRESS
#$ -m eas
#
module load mathworks/R2009b
#$ -V

matlab -c port@license-server -nodisplay -nojvm < matlab-script
Then submit the script to the scheduler with
$ cd $UABGRID_SCRATCH/jobs/matlab/serial01
$ qsub matlabtest.qsub
Check on it with qstat.
$ qstat -u $USER
Distributed Matlab
These instructions provide an example of how to create and submit a distributed Matlab job on cheaha.
Distributed Matlab jobs use the following licenses:
- Your own Matlab client license with the Parallel Computing Toolbox
- The Cheaha Distributed Computing license
The client license will only be needed for as long as it takes Matlab to start the job on the compute nodes (unless you keep the client open, for example using "waitForState(job)" in your Matlab script).
The instructions are a work in progress, so please contact Research Computing support with any questions or corrections.
First, create the working directory for the job
$ mkdir -p $UABGRID_SCRATCH/jobs/matlab/distrib01/output
$ cd $UABGRID_SCRATCH/jobs/matlab/distrib01
Next, create a simple 2 task distributed Matlab script called "distrib.m" make sure to change:
* email to your email address
* s_rt to an appropriate soft wall time limit
* h_rt to the maximum wall time for your job
* mem_free to the maximum memory needed for each task
* outputDirectory to the directory where results should be stored
Don't make any changes to the section labeled "Configure the scheduler"
% Always set these variables
email           = 'YOUR_EMAIL_ADDRESS';
s_rt            = '00:05:00';
h_rt            = '00:07:00';
mem_free        = '1G';
clusterHost     = 'cheaha.uabgrid.uab.edu';
scratch         = getenv('UABGRID_SCRATCH');
outputDirectory  = [scratch, '/jobs/matlab/distrib01/output'];

% Configure the scheduler
sched = findResource('scheduler', 'type', 'generic');
set(sched, 'DataLocation'       , outputDirectory);
set(sched, 'ClusterMatlabRoot', '/share/apps/mathworks/R2009b');
set(sched, 'HasSharedFilesystem',  true              );
set(sched, 'ClusterOsType'      , 'unix'             );
set(sched, 'SubmitFcn', {@sgeSubmitFcn, h_rt, s_rt, mem_free, email});
set(sched, 'DestroyJobFcn', {@sgeDestroyJob});
set(sched, 'GetJobStateFcn', {@sgeGetJobState});
get(sched)
job = createJob(sched);

% start of user specific commands
createTask(job, @rand, 1, {3,3});
createTask(job, @rand, 1, {3,3});

submit(job)
Running the Matlab script will submit 2 SGE single slot (CPU) jobs, one for each task. The Parallel Computing Toolbox requires Java VM, so notice that for this job we do not include the "-nojvm" switch!
$ module load mathworks/R2009b
$ matlab -c port@license-server -nodisplay < distrib.m
Check qstat to see that the scheduler now has 2 jobs running, one for each task
$ qstat -u $USER

job-ID  prior   name       user         state submit/start at     queue                          slots ja-task-ID
-----------------------------------------------------------------------------------------------------------------
 110839 0.50167 Job1.1     jdoe         r     03/10/2010 16:32:37 all.q@compute-0-12.local           1
 110840 0.50083 Job1.2     jdoe         r     03/10/2010 16:32:37 all.q@compute-0-12.local           1
The job output can be found in the "output" directory
Parallel Matlab
These instructions provide an example of how to create and submit a parallel Matlab job on cheaha. Parallel Matlab jobs require two separate licenses:
* Your own client license that includes the Parallel Computing Toolbox
* The Cheaha 128 node Distributed Computing license
The client license will only be needed for as long as it takes Matlab to start the job on the compute nodes (unless you keep the client open, for example using "waitForState(job)" in your Matlab script).
Check out this Matlab Help Page for a quick overview of using parallel code in your Matlab scripts.
First, create the working directory for the job
$ mkdir -p $UABGRID_SCRATCH/jobs/matlab/paralle01/output
$ cd $UABGRID_SCRATCH/jobs/matlab/parallel01
Next, create a simple 4 slot parallel Matlab script called "parjob.m" make sure to change:
* email to your email address
* s_rt to an appropriate soft wall time limit
* h_rt to the maximum wall time for your job
* mem_free to the maximum memory needed for each task
* outputDirectory to the directory where results should be stored
Don't make any changes to the section labeled "Configure the scheduler"
% Always set these variables
email           = 'YOUR_EMAIL_ADDRESS';
s_rt            = '00:05:00';
h_rt            = '00:07:00';
mem_free        = '2G';
clusterHost     = 'cheaha.uabgrid.uab.edu';
scratch         = getenv('UABGRID_SCRATCH');
outputDirectory = [scratch, '/jobs/matlab/parallel01/output'];

% Configure the scheduler
sched = findResource('scheduler', 'type', 'generic');
set(sched, 'DataLocation'       , outputDirectory);
set(sched, 'ClusterMatlabRoot', '/share/apps/mathworks/R2009b');
set(sched, 'HasSharedFilesystem',  true              );
set(sched, 'ClusterOsType'      , 'unix'             );
set(sched, 'ParallelSubmitFcn', {@sgeParallelSubmitFcn, h_rt, s_rt, mem_free, email});
set(sched, 'DestroyJobFcn', {@sgeDestroyJob});
set(sched, 'GetJobStateFcn', {@sgeGetJobState});
get(sched)
pjob = createParallelJob(sched);

% start of user specific commands
createTask(pjob, 'rand', 1, {4});
set(pjob, 'MinimumNumberOfWorkers', 4);
set(pjob, 'MaximumNumberOfWorkers', 4);

submit(pjob)
Running the Matlab script will submit 1 SGE job requesting 4 slots (cpu cores). The Parallel Computing Toolbox requires Java VM, so notice that for this job we do not include the "-nojvm" switch!
$ module load mathworks/R2009b
$ matlab -c port@license-server -nodisplay < parjob.m
Check qstat to see that the scheduler now has 2 jobs running, one for each task
$ qstat -u $USER

job-ID  prior   name	   user         state submit/start at     queue                          slots ja-task-ID
-----------------------------------------------------------------------------------------------------------------
 110857 0.00000 Job1	   jdoe         r     03/10/2010 17:20:08                                    4
The job output can be found in the "output" directory
ParFor Parallel Example
This example will utilize the parfor parallel loop as defined here.
